
The collector car market, in your inbox
Classic car news, hand-picked vehicles, and auction coverage. Choose what lands in your inbox.
By Kyle Smith
The snow mounds are receding and the mercury is beginning to rise for much of the U.S., which means that many gearheads are eyeballing their currently tucked-away vintage rides. If you are giddy with anticipation about driving that long-stored vehicle, here are five steps to follow to get your next driving season started off smoothly.
The snow mounds are receding and the mercury is beginning to rise for much of the U.S., which means that many gearheads are eyeballing their currently tucked-away vintage rides. If you are giddy with anticipation about driving that long-stored vehicle, here are five steps to follow to get your next driving season started off smoothly.
Inspect
Even if you put the car away properly, and kept an eye on it over winter, the first thing you should do is go over it with a keen eye. Bumper to bumper and roofline to contact patch, grab your favorite flashlight (everyone has a favorite flashlight, right?) and examine each nook and cranny of your car.
Keep an eye out for cracks, evidence of leaks, worn-out bushings, or wiring that needs attention. Despite your best efforts, you might have to evict a rodent. Now is the time, however, before you tear off on the first, triumphant drive and a nest dislodges and causes even more damage. Meticulously taking stock of the car each year is a great way to ensure that deteriorating parts do not cause additional damage.
The most important system to inspect right now is the brakes. I start with a hard/harder test at the pedal. Sit in the driver’s seat and press the brake pedal as if you were coming to a normal stop and hold the pedal down for 10 seconds or so after the pedal stops moving. Now press even harder on the pedal—more akin to a panic stop—and hold pressure again. The pedal should stay rock solid, not slowly move towards the floor. After this test, inspect the brake system once more, looking for leaks or signs of fluid escaping the system. This is a pass-or-fail exam, and now is the time to find any issues, not on the open street.
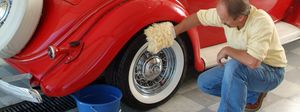
Clean
Even in storage, dirt and grime accumulate on your beloved ride. Take the time to remove all this damaging debris from both painted and soft surfaces. We have talked about good detailing technique before, and we will always recommend keeping both the interior and exterior of your ride clean.
You can perform this step at the same time as the inspection, but I prefer to keep the tasks separate so I don’t lose my mechanically-oriented concentration amid a mist of quick detailer. Treat rubber weather stripping to keep the sealing intact, therefore allowing less dust inside the interior (unless you prefer to go topless.) Interior fabrics should get a protectant to start the season off right and make for easier cleaning later on, when you would rather be driving or showing than detailing.
Prepare to start
That’s right, we’re slicing this process pretty thin. However, even when properly stored, a dormant engine can benefit from a slow awakening. Ensuring components are ready to move again will go a long way to ensuring your engine has not only a good driving season but a healthy extended life.
Engines drain oil from top to bottom, and after sitting all season there is likely very little—if any—oil at the top end of the engine. If you have the ability and confidence to spin the oil pump before cranking the engine with the start, do that. If not, grab an oil can and remove the valve covers and oil the top end. This won’t get the main bearings, but it is better than nothing.
Hopefully, your inspection told you that the fuel lines were in good shape (if they weren’t, replace and then come back to this step) so it’s time to get fuel pressure in the system. Be prepared for anything at this point, especially if you stored the car filled with fuel that has ethanol blended into it. An electric fuel pump is great for these situations, since you can pressurize the system rather than cranking the engine for a bit.
If you don’t have an electric pump, disconnect the ignition by pulling the coil wire to the distributor and crank the engine till you see oil and fuel pressures. You’ll know that fuel pressure is adequate on a carbureted engine if the accelerator pump squirts fuel into the intake when the throttle is opened by hand. Replace the coil wire once this process is complete.
Start
Now the fun part. While it pales in comparison to starting a rebuilt engine for the first time, starting your vintage car for the first time of the season is the pick-me-up most of us could use right now.
A few pumps of the accelerator on a carbureted engine will get some raw fuel in the intake manifold to make starting a bit easier. Fuel-injected engines will only need a turn of the key. Once running, let the engine idle for a few minutes as you look around the engine compartment for any leaks and listen for strange noises. Diagnose anything you find right away.
Go for a short drive
You finally made it to the part you have been waiting for this whole time. Put the car in gear and start slowly—a trip around the block or down the street, for example. Pay attention to any noises or vibrations that seem out of the ordinary. Investigate accordingly.
Just like that, you are on the path to another great season of driving. Keep up on the maintenance on your classic and you will be rewarded with miles of enjoyment. Is there an extra step you like to take with your car? Post it in the comments below; you might help another gearhead. For now, though, get out in the garage and get your car ready to cruise at a moment’s notice.